포스팅 개요
본 포스팅은 Apache Airflow(에어플로우)에 대해서 정리하는 Airflow 시리즈 포스팅입니다.
Airflow 포스팅에서는 아래와 같은 순서로 Airflow에 대해서 정리해보려고 합니다.
- Airflow란 무엇인가? Airflow 설치 방법과 간단한 예제 ( https://lsjsj92.tistory.com/631 )
- Airflow branch(분기) 예제 및 airflow 파이썬(Python) operator 활용 간단 예제 ( https://lsjsj92.tistory.com/632 )
- Airflow를 활용한 머신러닝 ( Machine Learning ) 예제 (본 포스팅)
- Airflow slack 메세지로 알람 받기 예제 (https://lsjsj92.tistory.com/634)
위와 같이 총 4가지의 글을 작성할 예정이며 본 글은 Airflow 세 번째 포스팅으로 Airflow를 활용한 Machine Learning 예제(example) 코드를 살펴보는 포스팅입니다.
해당 포스팅을 작성하면서 참고한 글은 아래와 같습니다.
- https://github.com/apache/airflow
- https://airflow.apache.org/docs/apache-airflow/stable/installation/index.html
- https://airflow.apache.org/docs/apache-airflow/stable/start/local.html
- https://airflow.apache.org/docs/apache-airflow/stable/concepts/dags.html
- https://airflow.apache.org/docs/apache-airflow/stable/concepts/xcoms.html
- https://airflow.apache.org/docs/apache-airflow/stable/_api/airflow/operators/index.html
- https://www.kaggle.com/c/titanic
본 포스팅 시리즈에서 사용되는 코드는 아래 github repo에서 확인하실 수 있습니다.
GitHub - lsjsj92/airflow_tutorial: python airflow tutorial and example
python airflow tutorial and example. Contribute to lsjsj92/airflow_tutorial development by creating an account on GitHub.
github.com
포스팅 본문
포스팅 개요에서도 언급하였듯이 이번 포스팅은 airflow를 활용한 머신러닝(Machine Learning) 예제(example)를 살펴봅니다.
본 포스팅에서 진행한 저의 Airflow와 Python 환경은 다음과 같습니다.
- Airflow 설치된 경로 : /Users/user_name/airflow
- Python 버전 : Python3.8
- Airflow 버전 : 2.2.3
- OS : Mac Pro
Airflow Machine Learning 예제
본 포스팅에서는 머신러닝(Machine Learning) 코드를 Airflow DAG에 활용합니다. 본 포스팅에서 사용한 데이터는 kaggle에서 제공해주는 타이타닉(titanic) 데이터를 활용합니다. 타이타닉 데이터는 캐글에 입문할 때 많이 접할 수 있는 데이터 셋이며 생존 여부를 예측하는데 사용하는 데이터 셋 입니다. 타이타닉 데이터는 포스팅 개요에 있는 캐글 타이타닉 링크에서 다운 받으실 수 있습니다.
또한, 본 포스팅에서 사용한 전체 코드는 포스팅 개요에 언급한 제 github에 전체 소스 코드가 업로드 되어 있으니 참고하시면 되겠습니다.
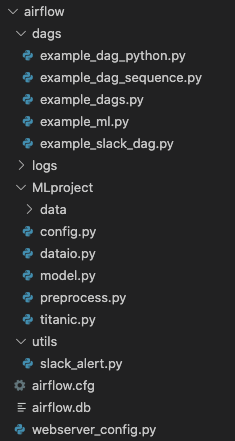
airflow 파일 구조는 아래 사진과 같습니다.

Titanic machine learning code 설명
타이타닉 데이터 셋을 활용한 머신러닝 코드는 상당히 많습니다. kaggle에도 다양한 예제가 올라와있고 좋은 성능을 보여주는 다양한 예제가 있습니다. 본 코드에서는 타이나틱 모델에 집중하기 보다는 airflow 환경안에서 머신러닝 코드를 돌려보는 것이 목적이기 때문에 매우 간단하게 데이터를 처리하고 모델도 간단하게 사용한다는 것을 미리 알려드립니다.
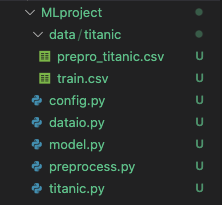
제가 구성한 타이타닉 머신러닝 코드 구성은 다음과 같습니다.

각 파일에 대한 설명은 아래와 같습니다.
- config.py
- Titanic machine learning을 돌리기 위한 각종 셋팅 값을 설정
- dataio.py
- 데이터를 읽어오거나 필요 데이터를 추출하는 작업을 수행
- model.py
- 머신러닝 모델 셋팅
- machine learning model training 수행
- preprocess.py
- 각종 전처리 작업 수행
- titanic.py
- titanic machine learning의 메인 파일
여기서 사실상 메인 코드는 titanic.py 파일이기 때문에 titanic.py 파일의 내용만 살펴보겠습니다.
titanic.py
class TitanicMain(TitanicPreprocess, PathConfig, TitanicModeling, DataIOSteam):
    def __init__(self):
        TitanicPreprocess.__init__(self)
        PathConfig.__init__(self)
        TitanicModeling.__init__(self)
        DataIOSteam.__init__(self)

    def prepro_data(self, f_name, **kwargs):
        # fname = train.csv
        data = self.get_data(self.titanic_path, f_name)
        data = self.run_preprocessing(data)
        data.to_csv(f"{self.titanic_path}/prepro_titanic.csv", index=False)
        kwargs['task_instance'].xcom_push(key='prepro_csv', value=f"{self.titanic_path}/prepro_titanic")
        return "end prepro"

    def run_modeling(self, n_estimator, flag, **kwargs):
        # n_estimator = 100
        f_name = kwargs["task_instance"].xcom_pull(key='prepro_csv')
        data = self.get_data(self.titanic_path, f_name, flag)
        X, y = self.get_X_y(data)
        model_info = self.run_sklearn_modeling(X, y, n_estimator)
        kwargs['task_instance'].xcom_push(key='result_msg', value=model_info)
        return "end modeling"
titanic.py 코드에는 titanic 데이터를 가져오고 전처리를 수행하고 머신러닝 모델 훈련을 수행하는 모든 일련의 작업이 담겨 있습니다. 총 2개의 함수로 구성되어 있으며 각 함수는 Airflow DAG 파일 안에서 task로 구성됩니다.
타이타닉 머신러닝 코드가 동작되는 순서는 아래와 같습니다.
- 최초 타이타닉 데이터를 load ( prepro_data )
- 타이타닉 데이터 전처리 및 prepro_csv로 저장 ( prepro_data )
- preprocessing을 거친 파일의 경로를 Airflow XCom에 저장 ( prepro_data )
- machine learning modeling 수행 ( run_modeling )
- Airflow XCom에서 저장된 전처리 데이터 경로를 가져옴( run_modeling )
- titanic 전처리 데이터 load ( run_modeling )
- model training ( run_modeling )
- model 정보 Airflow XCom에 저장 ( run_modeling )
- 종료
Airflow machine learning DAG 예제 코드
다음은 Airflow DAG code에 대해서 살펴봅니다. 기본적으로 앞 포스팅에서 살펴본 DAG와 동일합니다. 다만 안에 동작하는 코드가 머신러닝 코드일 뿐입니다. 그 코드는 아래와 같습니다.
from airflow import DAG
from airflow.operators.bash import BashOperator
from airflow.operators.python_operator import PythonOperator
from airflow.utils.trigger_rule import TriggerRule

from MLproject.titanic import *

titanic = TitanicMain()

def print_result(**kwargs):
    r = kwargs["task_instance"].xcom_pull(key='result_msg')
    print("message : ", r)

with DAG( **dag_args ) as dag:
    start = BashOperator(
        task_id='start',
        bash_command='echo "start!"',
    )

    prepro_task = PythonOperator(
        task_id='preprocessing',
        python_callable=titanic.prepro_data,
        op_kwargs={'f_name': "train"}
    )

    modeling_task = PythonOperator(
        task_id='modeling',
        python_callable=titanic.run_modeling,
        op_kwargs={'n_estimator': 100, 'flag' : True}
    )

    msg = PythonOperator(
        task_id='msg',
        python_callable=print_result
    )

    complete = BashOperator(
        task_id='complete_bash',
        bash_command='echo "complete~!"',
    )

    start >> prepro_task >> modeling_task >> msg >> complete
본 DAG 코드에서 핵심 코드 설명은 아래와 같습니다.
1. 필요 라이브러리 import
from airflow import DAG
from airflow.operators.bash import BashOperator
from airflow.operators.python_operator import PythonOperator
from airflow.utils.trigger_rule import TriggerRule

from MLproject.titanic import *

titanic = TitanicMain()
본 airflow dag 예제에서는 Python을 활용합니다. 따라서 필요한 Operator인 Python operator와 bash operator를 가져옵니다.
그리고 위에서 정의한 타이타닉 머신러닝 코드를 실행할 코드를 import 하고 객체를 생성합니다.
2. Python Operator 설정
다음으로 Python operator를 사용해 각 task를 정의합니다.
start = BashOperator(
    task_id='start',
    bash_command='echo "start!"',
)

prepro_task = PythonOperator(
    task_id='preprocessing',
    python_callable=titanic.prepro_data,
    op_kwargs={'f_name': "train"}
)

modeling_task = PythonOperator(
    task_id='modeling',
    python_callable=titanic.run_modeling,
    op_kwargs={'n_estimator': 100, 'flag' : True}
)

msg = PythonOperator(
    task_id='msg',
    python_callable=print_result
)

complete = BashOperator(
    task_id='complete_bash',
    bash_command='echo "complete~!"',
)
여기서 3개의 Python operator를 사용해서 3개의 task를 정의합니다. 각 task에 대한 설명은 아래와 같습니다.
- prepro_task
- 타이타닉 데이터를 전처리 수행하는 DAG task
- titanic.py에 있는 prepro_data 함수를 python_callable에 사용
- prepro_data 함수에서 사용하는 parameter f_name을 op_kwargs로 보내줌
- modeling_task
- 전처리 된 타이타닉 데이터를 활용해 머신러닝 모델링 수행
- titanic.py에 있는 run_modeling 함수를 python_callable에 사용
- run_modeling 함수에서 사용하는 n_estimator와 flag를 op_kwargs로 보내줌
- msg
- 앞서 받은 결과 값을 XCom에서 가져와서 출력
즉, titanic.py에서 정의된 함수를 python operator의 python_callable에 지정하고 해당 함수를 동작하도록 지정합니다.
각 task는 타이타닉 데이터 전처리, 타이타익 데이터를 활용한 machine learning model training 수행, 결과를 출력하는 역할을 담당하고 있습니다.
3. task relationship 설정
마지막으로 dag task의 relationship을 설정합니다.
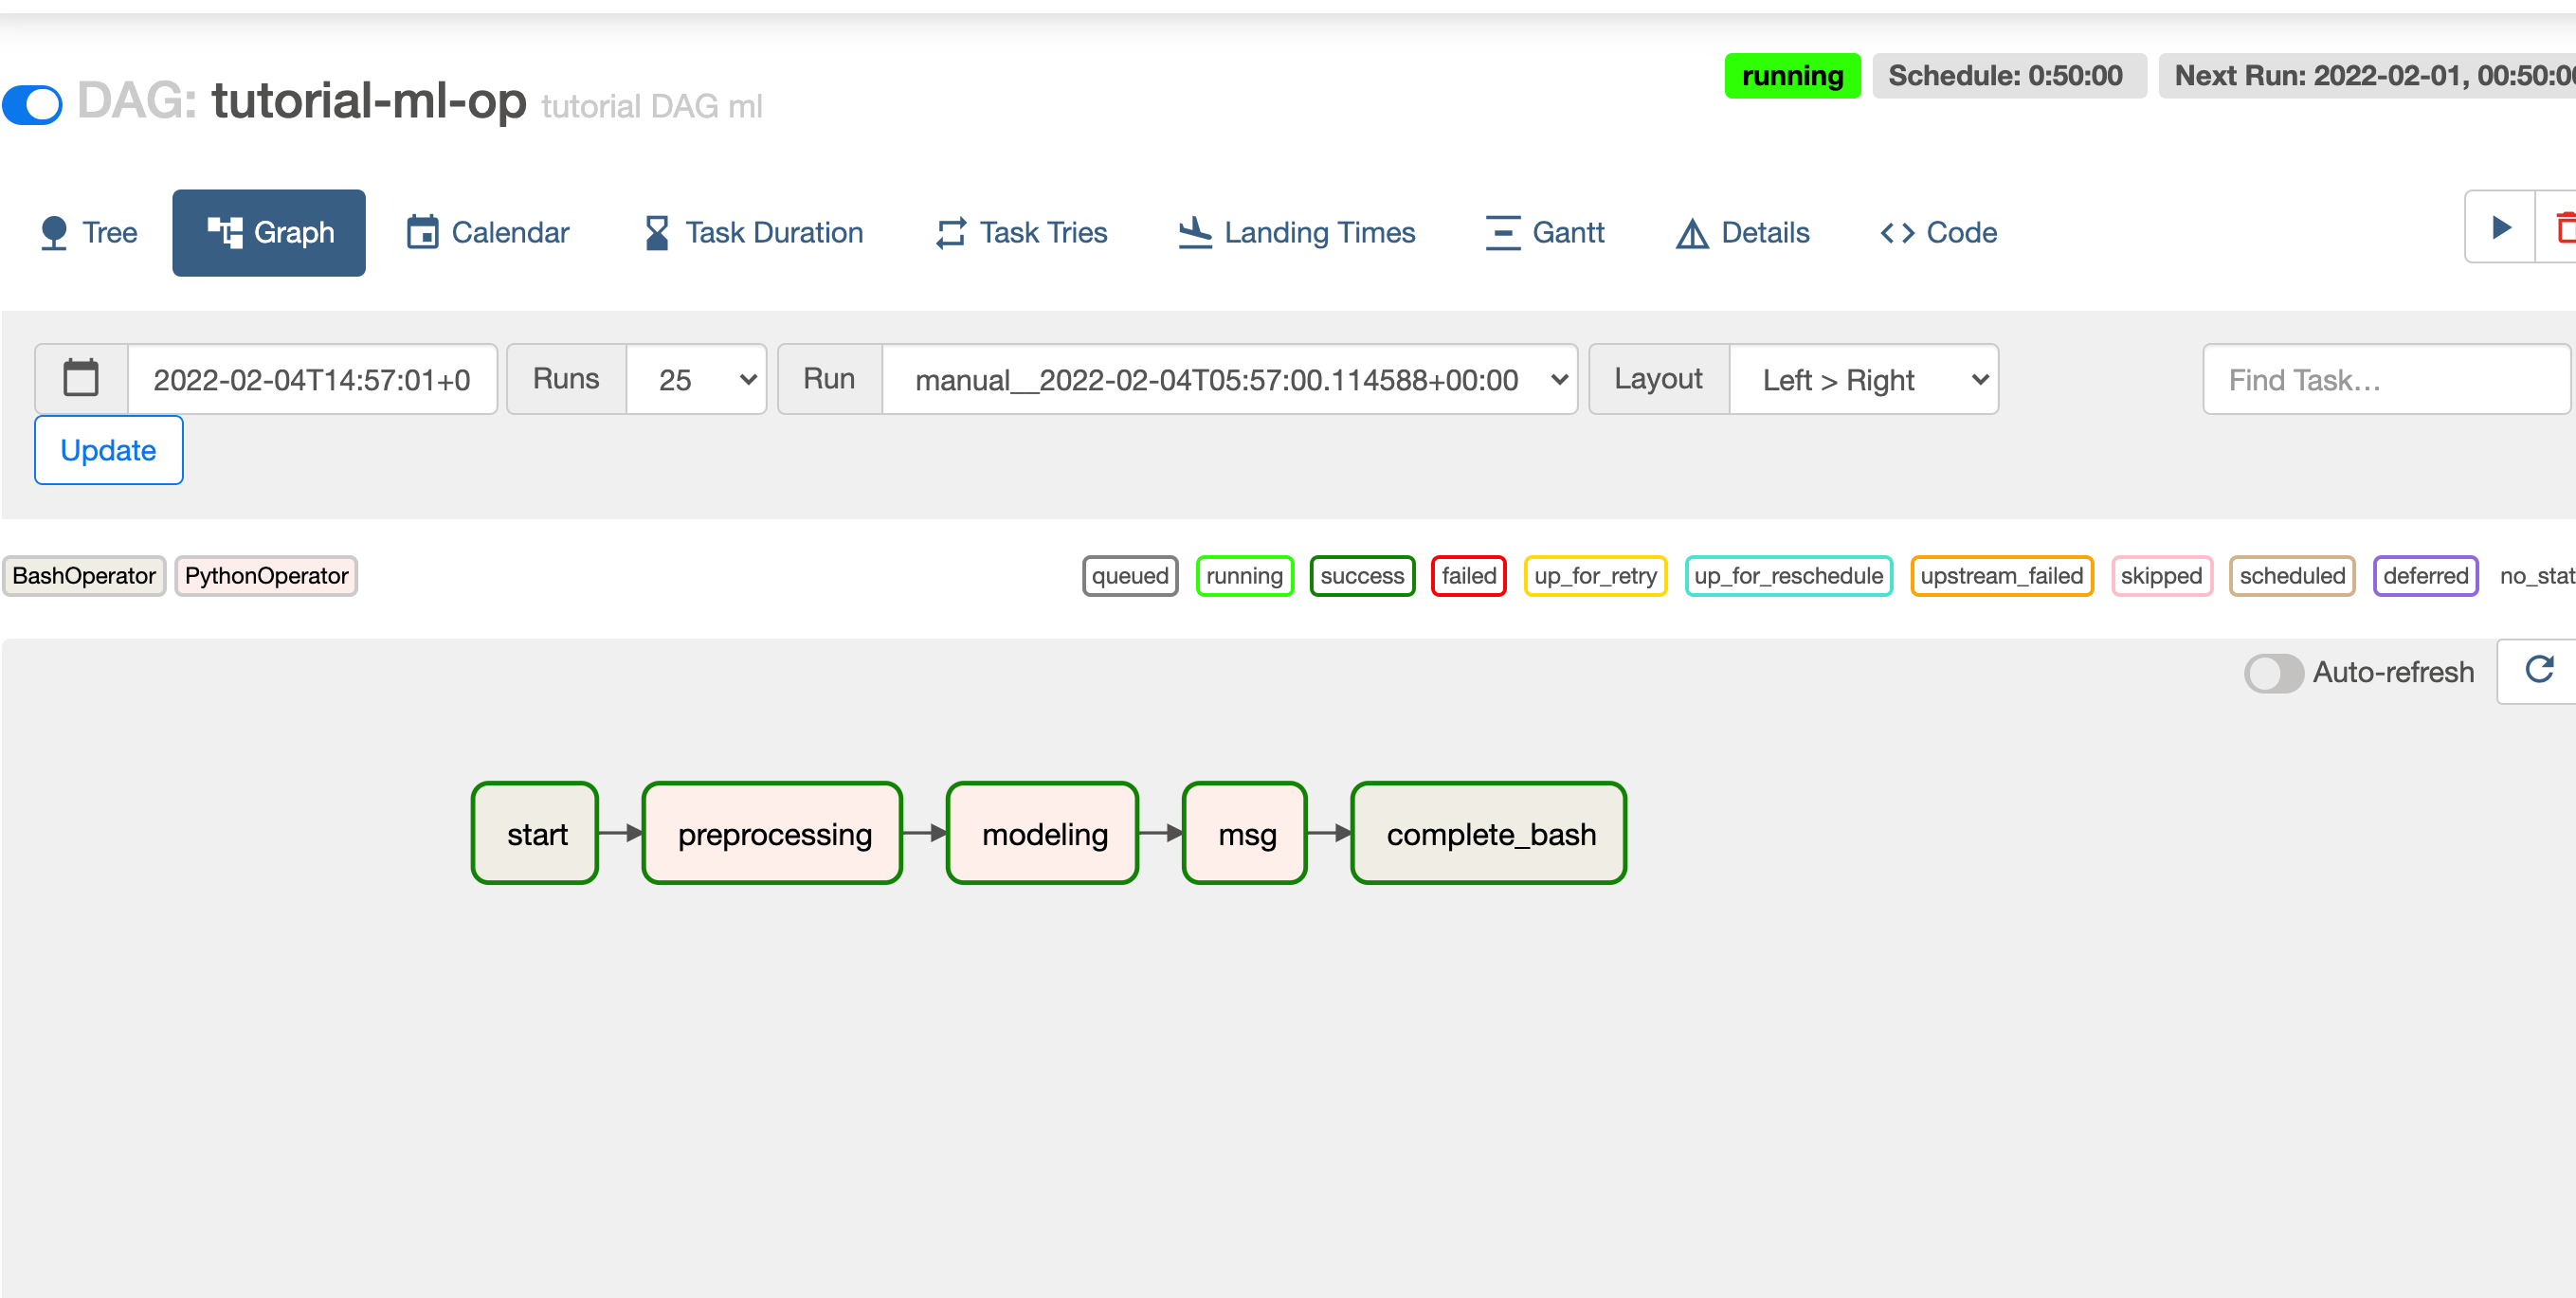
start >> prepro_task >> modeling_task >> msg >> complete위 relationship을 보면 각 task는 순서대로 진행됩니다.
- 시작
- 타이타닉 데이터 전처리 task 수행
- 전처리 된 타이타닉 데이터 머신러닝 모델링 수행
- 메세지 출력
- 완료
실행 결과
위 DAG를 Airflow Scheduler에 등록시키고 실행시켜 봅니다. 먼저, command line 에서 DAG가 제대로 등록이 되었는지 확인해봅니다. 명령어는 aiflow dags list, airflow tasks list {dag-id} --tree 입니다.
aiflow dags list
airflow tasks list {dag-id} --tree

잘 등록되었다면 위와 같이 aiflow dag list에 나오는 것을 확인할 수 있습니다.
이제 airflow web server를 실행시켜 web ui에서 확인해봅니다.

방금 등록힌 dag인 tutorial-ml-op라는 dag가 등록된 것을 확인할 수 있습니다.
해당 dag를 클릭해보면 tree, graph 등 다양한 화면을 확인할 수 있을겁니다.
이제 해당 dag를 실행시켜봅니다. 실행시키면 아까 정의한 task relationship처럼 순서대로 task가 실행되는 것을 확인할 수 있습니다.
실행한 결과는 아래와 같이 graph와 tree 형태로 확인할 수 있습니다.


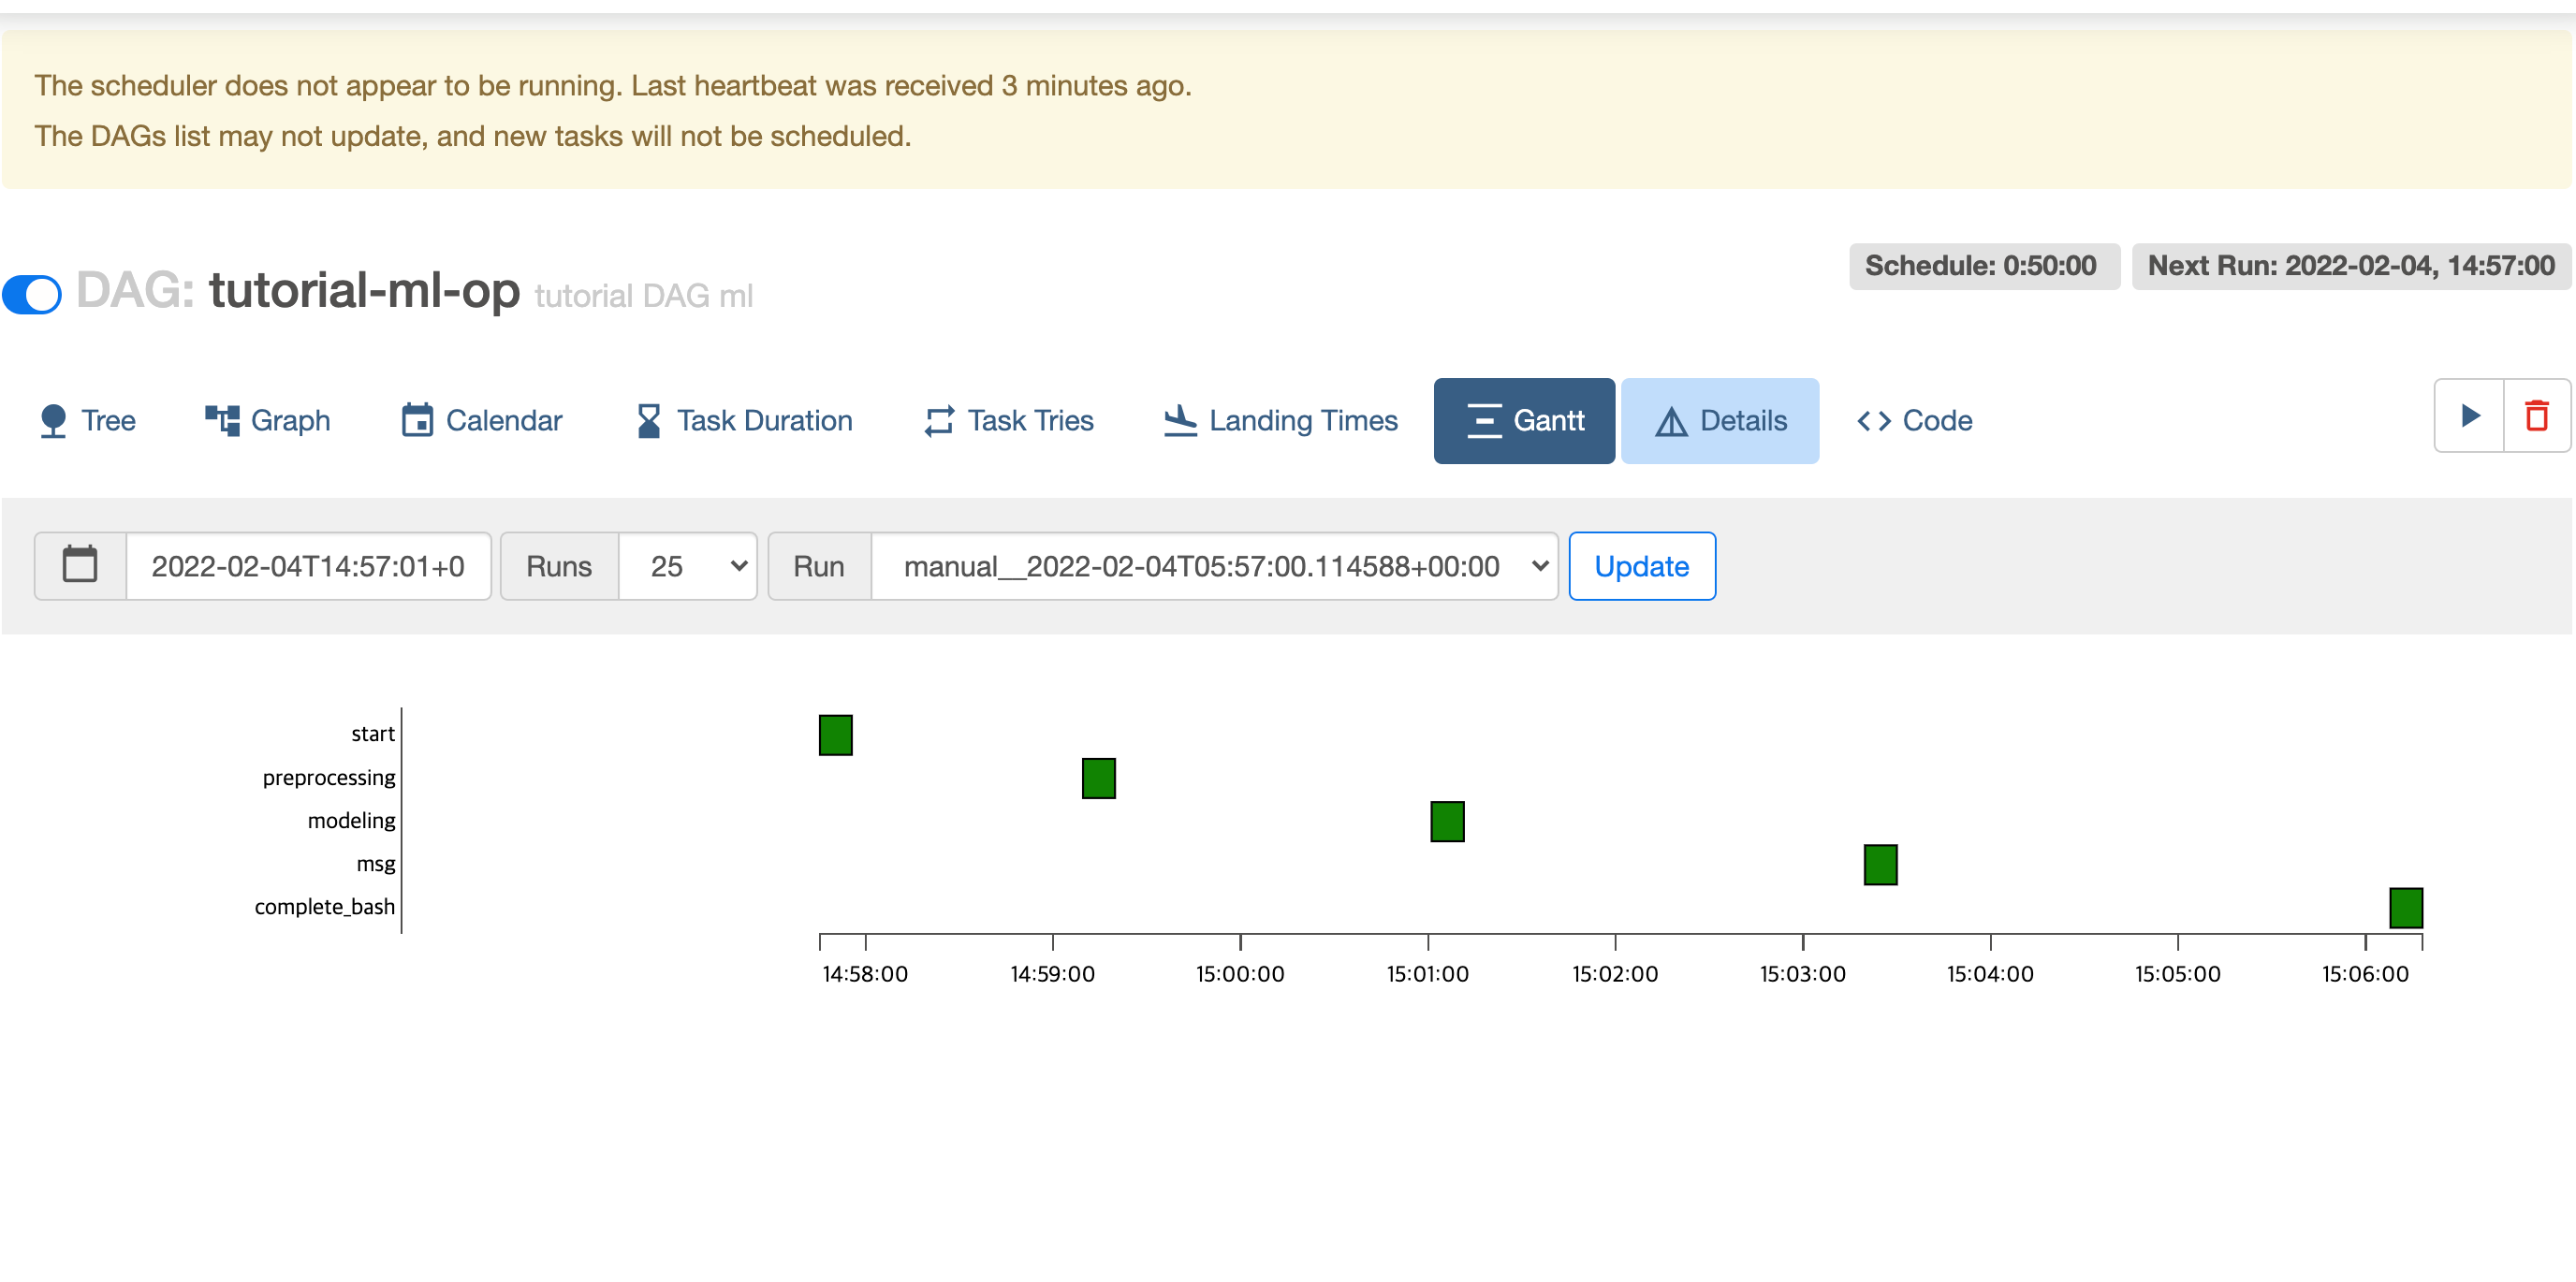
그 외에도 Gantt 탭에 들어가면 어디서 얼마나 시간이 걸렸는지 정보도 확인할 수 있습니다.

위 machine learning dag를 실행시키면 맨 마지막에 msg task에서 결과를 print합니다.
이 결과 값은 airflow XCom 결과 값을 pull로 가져와서 출력해주는데요. 그 결과는 아래 사진과 같습니다.

제가 설정한 타이타닉 머신러닝 메세지는 model의 metric과 parameter 값을 출력하도록 하였습니다.
score는 accuracy를 기준으로 하였으며 제가 실행시킨 machine learning 모델은 타이타닉 생존 예측 결과에 대해 80% 정확도를 보였습니다.
기타 다른 방법
이렇게 함수로 실행시키지 않고 bash shell을 이용하는 Bash Operator를 이용해서 바로 실행시킬 수도 있습니다.
bash_command = """
    python3 /user/leesoojin/airflow/MLProject/titanic.py
"""

dag_args = dict(
    dag_id="tutorial-ml-op",
    default_args=default_args,
    description='tutorial DAG ml',
    schedule_interval=timedelta(minutes=50),
    start_date=datetime(2022, 2, 1),
    tags=['example-sj'],
)

with DAG( **dag_args ) as dag:
    train = BashOperator(
        task_id='train',
        bash_command=bash_command
    )

    train
마무리
본 포스팅에서는 airflow dag 예제 중 머신러닝(Machine Learning) 예제를 살펴보았습니다.
누군가에게 도움이 되시길 바라며 읽어주셔서 감사합니다.
저에게 연락을 주시고 싶으신 것이 있으시다면
- Linkedin : https://www.linkedin.com/in/lsjsj92/
- github : https://github.com/lsjsj92
- 블로그 댓글 또는 방명록
으로 연락주시면 감사하겠습니다.
'Data Engineering 및 Infra' 카테고리의 다른 글
| Python OpenAI API를 활용해 GPT3(GPT3.5) 사용하기(Feat. ChatGPT) (4) | 2023.02.13 |
|---|---|
| Apache 에어플로우(Airflow) 예제(example) - slack으로 알람, 메세지 받기 (8) | 2022.03.21 |
| Apache 에어플로우(Airflow) - DAG branch(분기) 예제(example) 및 Python operator, XCom에 대해서 (0) | 2022.02.21 |
| Apache 에어플로우(Airflow) 시작하기 - Airflow란?, Airflow 설치 및 기본 예제 (16) | 2022.02.06 |
| Python MLflow example 정리 - machine learning lifecycle 관리 (2) | 2021.10.11 |


